Creating a Custom Table with a Module in Drupal and Integrating it with Views

In Drupal, due to database normalization rules, each field created within core entities results in the creation of two tables in the database. If you want some of your data to occupy less space in the database, you might prefer to store these data in a custom table on the database side.
In Drupal, each field created within core entities results in the creation of two tables in the database due to normalization rules. If you want certain data to occupy less space in the database, you might prefer to store this data in a custom table. For example, if you want to measure user reactions to a piece of content, creating a table with fields such as ID, Nid, Uid, Vote, and Date would take up less space than creating a Custom Entity.
If you decide to use the Custom Table method instead of Entity/Custom Entity to store your necessary data, this blog post will guide you from basic to advanced levels on:
- Creating a Custom Module
- Creating a Custom Table within the Module
- Creating Functions to Respond to Custom URLs
- Adding Data to the Custom Table
- Updating Data in the Custom Table
- Merging Data in the Custom Table (Update if Exists, Add if Not)
- Deleting Data from the Custom Table
- Displaying Data from the Custom Table
- Integrating and Using Custom Table Data with Views
1. Creating a Custom Module
To be recognized as a module by Drupal, a folder created in a directory must have a file that starts with the folder name and ends with .info.yml. The modules/custom directory is used to create custom modules in Drupal.
Let's create a folder named custom_rate in the modules/custom directory. Inside this folder, define a file named custom_rate.info.yml with the following content:
name: Custom Rate
type: module
description: The description.
package: Custom
core: 8.x
core_version_requirement: ^8 || ^9 || ^10
Name: This is the name that will appear in the extensions section of your module.
Type: This defines the type of files in the folder. Use module for modules and theme for themes (you need to specify the base theme for themes). This parameter, not the directory name, tells Drupal whether the code is a module or theme. For example, you could technically define a theme in the modules/custom directory.
Description: This is the description that will appear in the extensions section of your module.
Package: This determines the group under which your module will be listed in the extensions section. You can use your company name here to group all custom code developed by your company.
Core and core_version_requirement: These specify the core versions compatible with your module.
You can find additional useful parameters for the .info.yml file at: https://www.drupal.org/docs/develop/creating-modules/let-drupal-know-about-your-module-with-an-infoyml-file

2. Creating a Custom Table within the Module
When installing the custom module we created, you might want a custom table to be created in the background, and similarly, you might want this table to be removed when the module is uninstalled. To achieve this, you need to create a file named module_name.install within your module's folder.
Create a custom_rate.install file inside your custom_rate folder. In this file, use the module_name_schema hook to define the table that will be created or removed when the module is installed or uninstalled.
Here’s an example structure for the custom_rate.install file:
function custom_rate_schema() {
$schema['custom_rate'] = [
'description' => 'Custom Rate İşlemleri',
'fields' => [
'id' => [
'type' => 'serial',
'not null' => TRUE,
'description' => 'Primary Key: Unique record ID.',
],
'uid' => [
'type' => 'int',
'unsigned' => TRUE,
'not null' => TRUE,
'default' => 0,
'description' => 'Oylayan Kişi',
],
'nid' => [
'type' => 'int',
'unsigned' => TRUE,
'not null' => TRUE,
'default' => 0,
'description' => 'Oylanan içerik id',
],
'rate' => [
'type' => 'int',
'unsigned' => TRUE,
'not null' => TRUE,
'default' => 0,
'description' => 'Oy',
],
'created' => [
'type' => 'int',
'unsigned' => TRUE,
'not null' => TRUE,
'default' => 0,
'description' => 'Oylanan içerik id',
],
'updated' => [
'type' => 'int',
'unsigned' => TRUE,
'not null' => TRUE,
'default' => 0,
'description' => 'Oylanan içerik id',
],
],
'primary key' => ['id'],
'indexes' => [
'id' => ['id'],
],
];
return $schema;
}
We create a custom table named custom_rate using $schema['custom_rate']. If you want to define multiple tables, you can define as many as you like before the return $schema.
'description' => 'Custom Rate Operations': This specifies a summary of the table. Providing the purpose of this table here makes it more sustainable for another developer who may later examine the database.
'fields': In this section, you need to specify the fields you want to include in this table.
Using the definitions below, you can add an auto_increment/primary field to your custom table.
'type' => 'serial',
'not null' => TRUE,
'description' => 'Primary Key: Unique record ID.',
],
ve fields’dan sonra da aşağıdaki tanımları kullanmanız gerekmektedir.
'indexes' => [
'id' => ['id'],
],
- type: Here you can specify the type of the field.
- unsigned: Determines whether the field will store only positive values.
- not null: Specifies whether the field can be left empty or not.
- default: The default value for the field. If no value is provided, it stores the value defined here.
- description: A description of the field.
After making these definitions, when we enable the module, our table will be created in the database as shown below.
3. Creating Functions that Respond to Custom URLs
In Drupal, you may want a function within the module you have developed to be accessible via a URL. This allows you to read data from users and process it in the background. You can achieve this by creating a module_name.routing.yml file within your module.
custom_rate.routing.yml
custom_rate.rate_add:
path: '/custom-rate/add/{nid}/{rate}'
defaults:
_title: 'oylama'
_controller: '\Drupal\custom_rate\Controller\CustomRateController::add'
requirements:
_permission: 'rate add'
custom_rate.rate_add: in this expression the custom_rate. part must be the name of the module. The section after the dot is the machine name of the route.
path: The URL that should respond.
defaults: _title: The title of the page.
defaults: _controller: Here we define the function that should respond when the URL specified in the path section is accessed. If we want a form to respond instead of a function within a controller, we should use ‘_form:’ instead.
requirements: _permission: Anyone with the specified permission can access this URL.
For more parameters that you can use in the routing file, you can refer to Drupal's documentation on the structure of routes: https://www.drupal.org/docs/drupal-apis/routing-system/structure-of-routes

4. Adding Data to a Custom Table (Database Insert)
In Drupal, when you want to add content to a custom table you have created, you need to use the database insert method. In our current example, we will create code that takes values from a URL and inserts them into the database.
Let's define a route that takes the content ID and the user's vote from the URL:
custom_rate.rate_add:
path: '/custom-rate/add/{nid}/{rate}'
defaults:
_title: 'oylama'
_controller: '\Drupal\custom_rate\Controller\CustomRateController::add'
requirements:
_permission: 'rate add'
In the routing.yml file, if you want to receive dynamic data from the user in the path section, you should define the variable name within {}. For example, if you want to get nid and rate information from the user, the path should be /custom-rate/add/{nid}/{rate}. You can then access and use these variables within the function defined by the _controller parameter.
public function add($nid, $rate) {
try {
$nid = Xss::filter($nid);
$rate = Xss::filter($rate);
$uid = \Drupal::currentUser()->id();
$currentTime = \Drupal::time()->getCurrentTime();
$con = \Drupal\Core\Database\Database::getConnection();
$con->insert('custom_rate')
->fields(['uid' ,'nid','rate', 'created','updated'])
->values([$uid, $nid, $rate, $currentTime, $currentTime])
->execute();
return new JsonResponse(['data' => $con->lastInsertId()]);
}
catch (\Throwable $e) {
return new JsonResponse(['data' => 0, 'hata' => $e->getMessage()]);
}
}
Since we are receiving values from the URL, to protect against SQL injection, we need to pass the values through the XSS::filter function. For XSS::filter to work, you need to include use Drupal\Component\Utility\Xss; at the beginning of your file.
$con = \Drupal\Core\Database\Database::getConnection();
$con->insert('custom_rate')
->fields(['uid' ,'nid','rate', 'created','updated'])
->values([$uid, $nid, $rate, $currentTime, $currentTime])
->execute();
The above commands add the values specified in the values section to the fields specified in the fields section of the custom_rate table. In other words, it adds the value of the $uid variable, which is listed first in the values section, to the uid field of the custom_rate table. Using $con->lastInsertId(), you can retrieve the ID of the primary field if the insertion is successful.

5. Updating Data in a Custom Table (Database Update)
In Drupal, you may want to change a value that you previously added to a custom table. To do this, you can use the database update method.
To take values from the URL and direct them to a function in the controller, we add the following definition to the routing.yml file:
custom_rate.rate_update:
path: '/custom-rate/update/{nid}/{rate}'
defaults:
_title: 'oylama'
_controller: '\Drupal\custom_rate\Controller\CustomRateController::update'
requirements:
_permission: 'rate update'
Here is how the update function in the controller should look:
public function update($nid, $rate) {
try {
$nid = Xss::filter($nid);
$rate = Xss::filter($rate);
$uid = \Drupal::currentUser()->id();
$currentTime = \Drupal::time()->getCurrentTime();
$con = \Drupal\Core\Database\Database::getConnection();
$con->update('custom_rate')
->fields(['rate' => $rate, 'updated' => $currentTime])
->condition('uid', $uid)
->condition('nid', $nid)
->execute();
return new JsonResponse(['data' => 'guncelendi']);
}
catch (\Throwable $e) {
return new JsonResponse(['data' => 0, 'hata' => $e->getMessage()]);
}
}
In the update function, unlike the insert function, we need to perform key-value assignments. In the above example, the value of the $rate variable is sent to the rate field. Unlike the insert operation, you can use conditions. If you want to change the fields of the record where uid matches the specified uid and nid matches the specified nid, you can use the code above.

6. Merge: Update if Exists, Insert if Not
In Drupal, sometimes we don't know if a record with the desired values exists. The first method that comes to mind might be to use a database select query to check if the record exists and then run either an update or insert query. However, this method is outdated and can make the code cluttered. Instead, we can use the database merge method in Drupal to handle this.
To take values from the URL and either update if the record exists or insert if it doesn't, we need to define a route in the routing.yml file as follows:
custom_rate.rate_merge:
path: '/custom-rate/merge/{nid}/{rate}'
defaults:
_title: 'oylama'
_controller: '\Drupal\custom_rate\Controller\CustomRateController::merge'
requirements:
_permission: 'rate add'
Then, in the function specified in the _controller, we can read the values and perform the necessary operations.
public function merge($nid, $rate) {
try {
$nid = Xss::filter($nid);
$rate = Xss::filter($rate);
$uid = \Drupal::currentUser()->id();
$currentTime = \Drupal::time()->getCurrentTime();
$con = \Drupal\Core\Database\Database::getConnection();
$con->merge('custom_rate')
->keys(['uid' => $uid, 'nid' => $nid])
->insertFields(array(
'uid' => $uid,
'nid' => $nid,
'rate' => $rate,
'created' => $currentTime,
'updated' => $currentTime,
))
->updateFields(array(
'rate' => $rate, // update time
'updated' => $currentTime, // update time
))
->execute();
return new JsonResponse(['data' => 'merge']);
}
catch (\Throwable $e) {
return new JsonResponse(['data' => 0, 'hata' => $e->getMessage()]);
}
}
In the merge method, we can say that conditions are written in the keys section. If there is a record with matching values in the keys section, the updates in the UpdateFields section will be executed. If not, the insertions in the UpdateFields section will be performed. This way, we complete our operations with modern and concise code.

7. Deleting Data from a Custom Table
In Drupal, we can use the delete method to remove values that we have added to a custom table. Let's write the code to take a value from the URL and perform the delete operation. For this, we need to define the following in routing.yml:
custom_rate.rate_delete:
path: '/custom-rate/delete/{nid}'
defaults:
_title: 'oylama'
_controller: '\Drupal\custom_rate\Controller\CustomRateController::delete'
methods: [GET]
requirements:
_permission: 'rate add'
Then, in the function specified in the _controller, we can read the values and perform the delete operation:
public function delete($nid) {
try {
$nid = Xss::filter($nid);
$uid = \Drupal::currentUser()->id();
$con = \Drupal\Core\Database\Database::getConnection();
$con->delete('custom_rate')
->condition('uid', $uid)
->condition('nid', $nid)
->execute();
return new JsonResponse(['data' => 'silindi']);
}
catch (\Throwable $e) {
return new JsonResponse(['data' => 0, 'hata' => $e->getMessage()]);
}
}
In the delete function, the delete operation is performed if there is a record that matches the conditions specified in the condition section.

8. Querying Data from a Custom Table
In Drupal, if you want to access and process data from a custom table you created, you can use the database select method. With the select method, you can specify conditions to filter the data and retrieve the fields you need.
Here’s an example of how to query data from the custom_rate table:
$query = \Drupal::database()->select('custom_rate', 't');
$query->fields('t', ['uid', ‘nid’]);
$query->condition('nid', $nid)
$query->distinct();
$result = $query->execute()->fetchAll();
Using this method, you can fetch values from the database and provide outputs in formats like JSON, table, or XLSX to the user. However, if you proceed with this method, you will need to write code for each format. For example, you might want to display the data in a table that only administrators can see, or allow the data to be downloaded as an XLSX file. Each of these tasks would require separate code.
If you are looking for a more professional way to handle data without writing extensive code for each format, you can continue to the next section. 🙂

9. Integrating and Using Data from a Custom Table with Views
In Drupal, you may want to present data stored in a custom table to users in a tabular format. You might need to allow users with specific roles to download this data as an XLSX file upon request, provide the data to external systems in JSON format, or display the data in any region using a block. Additionally, you may want to add pagination to these displays. If you think of doing all this with custom code, you might face significant time losses. To avoid this, you can leverage Drupal Entity's powerful Views system to handle custom table data, which would be fantastic.
Yes, it is possible to use the Views structure for custom tables. You can present the data from custom tables using Drupal’s robust Views system and its components. To link the custom table with Views, you use the hook_views_data hook. By defining this hook in your module's module_name.module file, you can connect the custom table with Views. You can perform this integration by using the view_custom_table module, or you can use the functions employed by this module, which we will detail below, to achieve the same result yourself.
Let's start with an example. Define the custom_rate_views_data function in the custom_rate.module file. Since our table name is custom_rate, it should be data['custom_rate'].
function custom_rate_views_data() {
$data['custom_rate']['table']['group'] = t('Custom Rate');
$data['custom_rate']['table']['base'] = array(
'title' => t('Custom Rate'),
'help' => t('Integration with Custom Rate Table'),
);
}
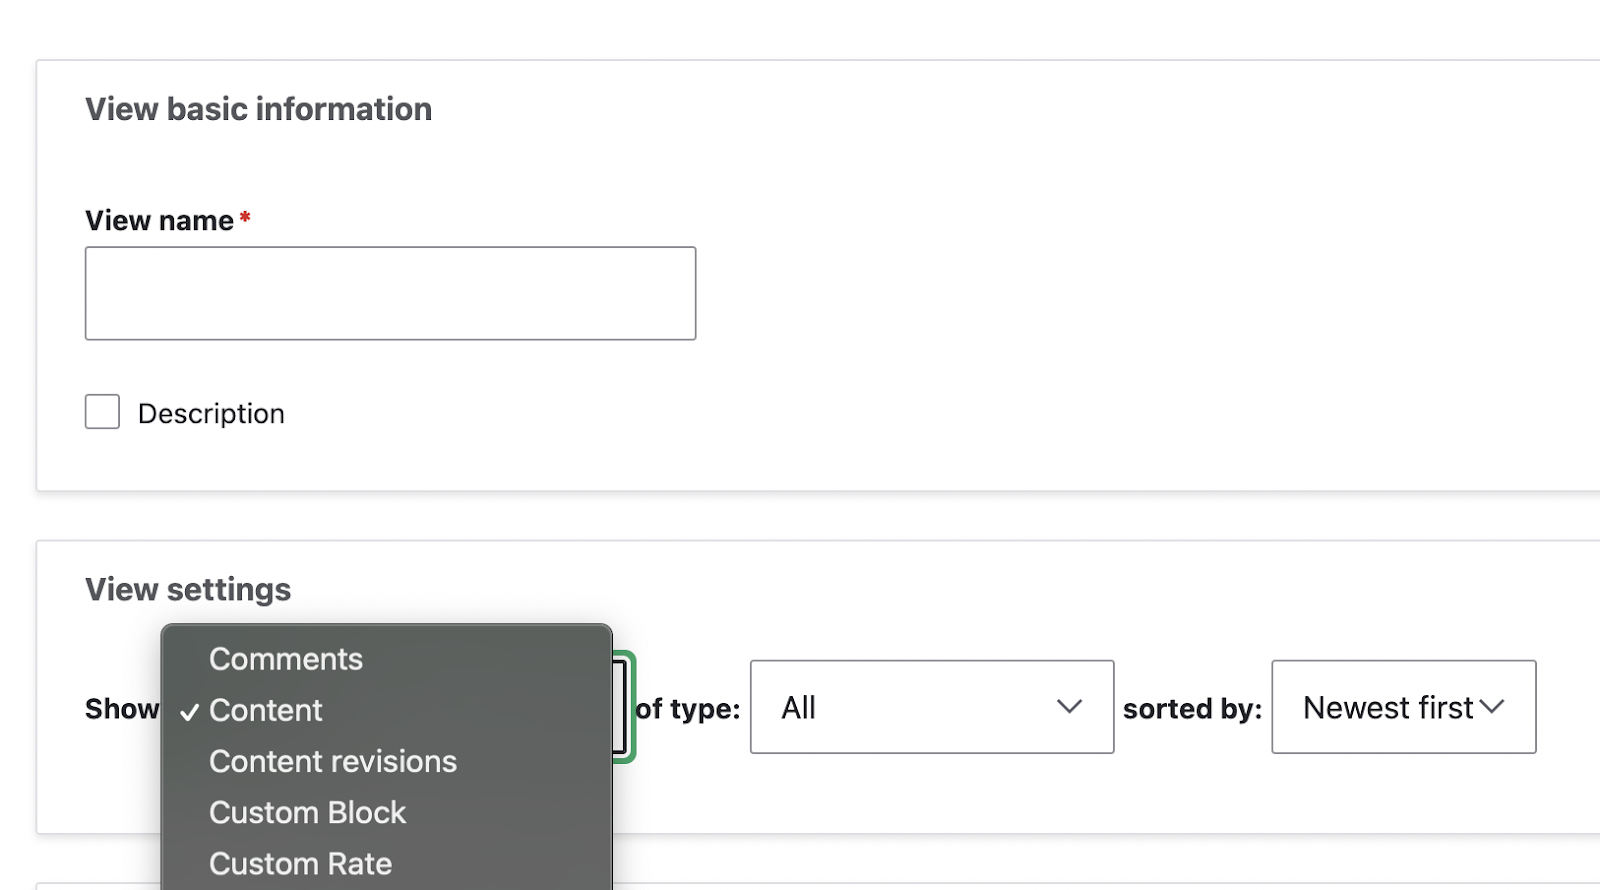
The expression specified in the title section indicates the name you will use in the View settings section on the view addition page (/admin/structure/views/add). If you select "Custom Rate" and continue, you will be able to create a view using the data defined in this hook.
If you want to create relationships in custom tables, such as in our example where nid is the ID of the node entity and uid is the ID of the user entity, you need to establish relationships to access any fields in those nodes or users. To create relationships in Views, we define table joins to the node_field_data table for nodes and the users_field_data table for users. We specify the field in our table in the left_field section and the corresponding field in the Drupal table in the field section.
$data['custom_rate']['table']['join'] = array(
'node_field_data' => array(
'left_field' => 'nid',
'field' => 'node_id',
),
'users_field_data' => array(
'left_field' => 'uid',
'field' => 'user_id',
),
);
To use the relationships in Views, we define the relationships as follows:
$data['custom_rate']['nid'] = [
'title' => 'Rate Node Id',
'field' => [
'id' => 'numeric',
],
'sort' => [
'id' => 'standard',
],
'filter' => [
'id' => 'numeric',
],
'argument' => [
'id' => 'numeric',
],
'relationship' => [
'base' => 'node_field_data',
'base field' => 'nid',
'id' => 'standard',
'label' => 'Rate Node Relationship',
],
];
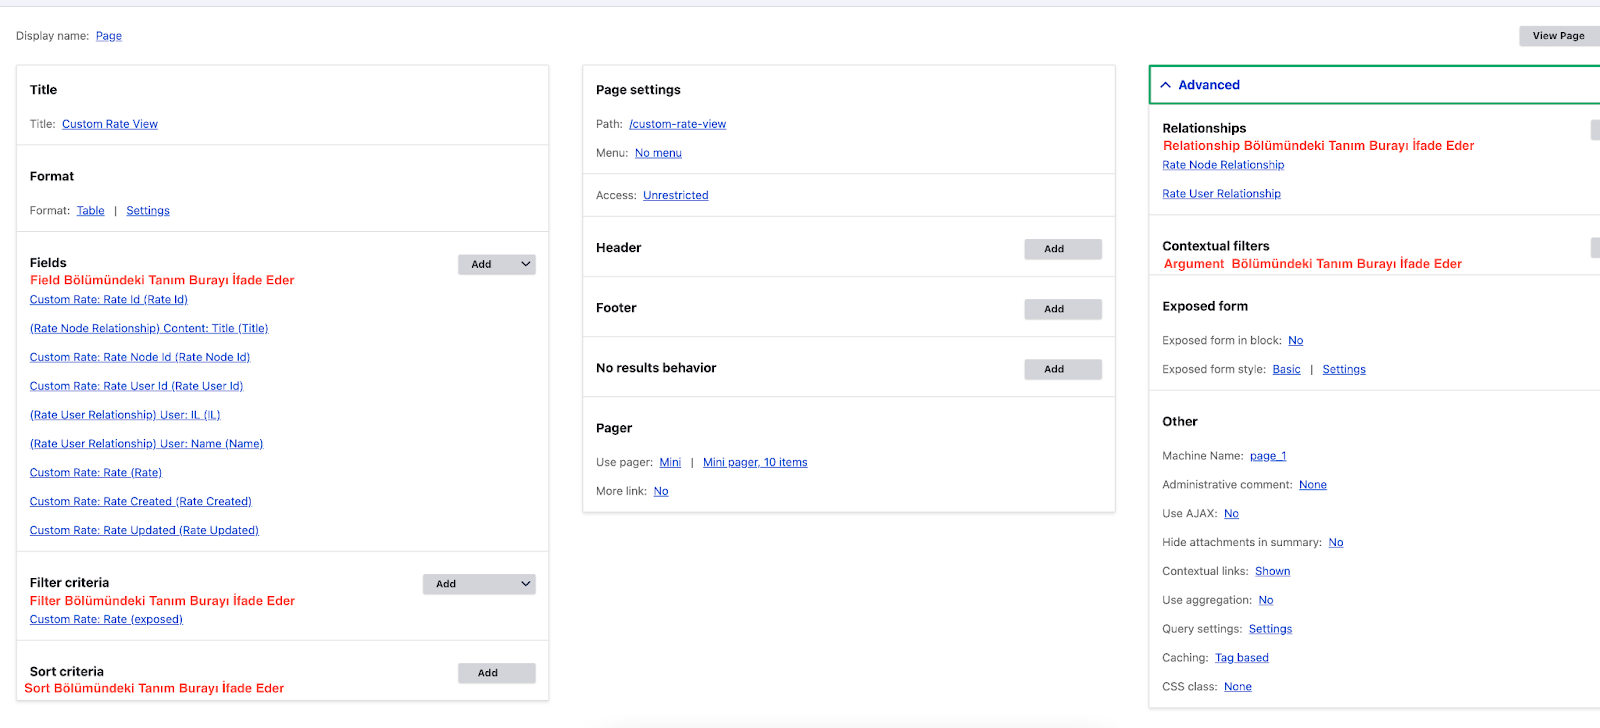
Here are the fields:
If there is a definition in the relevant fields, it will be available in the corresponding section of Views. If there is no definition, you will not see the relevant field when you click Add in the respective section. For example, if the Sort definition was not made, the nid value would not appear in the sorting section of Views.
- Title: The title of the field to be used in the view from the custom table.
- Field: Specifies how the field's data will be rendered in the field section of Views. In the above example, it is specified to be rendered as numeric.
- Sort: Specifies the type of the field in the sorting section of Views.
- Filter: Specifies the type of the field in the filtering section of Views.
- Argument: Specifies the type of the field in the contextual filter section of Views.
- Relationship: Specifies which entity in Drupal the field will be connected to in the relationship section of Views.
The fields in Views are defined below.
In the final case, our example code is as follows:
<?php
/**
* @file
* Primary module hooks for Custom Rate module.
*
* @DCG
* This file is no longer required in Drupal 8.
* @see https://www.drupal.org/node/2217931
*/
function custom_rate_views_data() {
$data['custom_rate']['table']['group'] = t('Custom Rate');
$data['custom_rate']['table']['base'] = array(
'title' => t('Custom Rate'),
'help' => t('Integration with Custom Rate Table'),
);
$data['custom_rate']['table']['join'] = array(
'node_field_data' => array(
'left_field' => 'nid',
'field' => 'node_id',
),
'users_field_data' => array(
'left_field' => 'uid',
'field' => 'user_id',
),
);
$data['custom_rate']['id'] = [
'title' => 'Rate Id',
'field' => [
'id' => 'numeric',
],
'sort' => [
'id' => 'standard',
],
'filter' => [
'id' => 'numeric',
],
'argument' => [
'id' => 'numeric',
],
];
$data['custom_rate']['nid'] = [
'title' => 'Rate Node Id',
'field' => [
'id' => 'numeric',
],
'sort' => [
'id' => 'standard',
],
'filter' => [
'id' => 'numeric',
],
'argument' => [
'id' => 'numeric',
],
'relationship' => [
'base' => 'node_field_data',
'base field' => 'nid',
'id' => 'standard',
'label' => 'Rate Node Relationship',
],
];
$data['custom_rate']['uid'] = [
'title' => 'Rate User Id',
'field' => [
'id' => 'numeric',
],
'sort' => [
'id' => 'standard',
],
'filter' => [
'id' => 'numeric',
],
'argument' => [
'id' => 'numeric',
],
'relationship' => [
'base' => 'users_field_data',
'base field' => 'uid',
'id' => 'standard',
'label' => 'Rate User Relationship',
],
];
$data['custom_rate']['rate'] = [
'title' => 'Rate',
'field' => [
'id' => 'numeric',
],
'sort' => [
'id' => 'standard',
],
'filter' => [
'id' => 'numeric',
],
'argument' => [
'id' => 'numeric',
],
];
$data['custom_rate']['created'] = [
'title' => 'Rate Created',
'field' => [
'id' => 'date',
],
'sort' => [
'id' => 'date',
],
'filter' => [
'id' => 'date',
],
'argument' => [
'id' => 'date',
],
];
$data['custom_rate']['updated'] = [
'title' => 'Rate Updated',
'field' => [
'id' => 'date',
],
'sort' => [
'id' => 'date',
],
'filter' => [
'id' => 'date',
],
'argument' => [
'id' => 'date',
],
];
return $data;
}
For more type definitions, you can visit the Drupal API documentation: https://api.drupal.org/api/drupal/core%21modules%21views%21views.api.php/function/hook_views_data/8.9.x
After this definition, you can transform the fields in the relevant table into any desired output using Views and modules.